-->
Showing posts with label Card. Show all posts

Sunday, May 15, 2011

Look what popped up

You gals are great! You've got it, It's a new file I'm finishing up for the store, called Layered Cake Pop-Up Card.


I've made options to make it perfect for a birthday cake (just change the colors to suit your boys or girls) with or without the frosting extras. There's also a way to make it into a beautiful formal wedding cake perfect for invitations or a gorgeous wedding card for the bride and groom.


So, what do you think?

Monday, April 18, 2011

Lookie, lookie...

Woo-hoo! I'm so excited to finally be cutting again. It seems like forever since I've dusted off my machine. The bonus? It's all for you...yup, this means new files coming up, because I'm finally finishing up some test cuts and tweaks.

Here's a peek at a new file I just got in the store...It's an Ornamental Flourish. It's perfect when cut out of vinyl for a wall-hanging plate but it's also designed to be cut from chipboard and used to emboss card front. All I did was cut the file from light weight chipboard (I'm honest...I used the back of a cereal box). Then I laid it behind the front of a precut, prepackaged 5 by 7 card (you know...the bag of 50 blank ones at the craft stores?). Place one or two of the tan rubbery spellbinders pads over top, run it through the cuttlebug, and voila! It's so easy to make an entire set of ornate cards perfect for gift giving.


I'm also including an triangular Flourish which fits right on the envelope flap as well. That way the envelope can match the card! Wouldn't it make a great Mother's Day gift? Just wrap up a stack of envelopes and cards, tie with a ribbon, maybe add a pen? I added two lines along the bottom front edge of the card with my Martha Stewart Scoring Board.


So, just click on one of the photos to go directly to this in the Paperthreads store!

Sunday, April 10, 2011

Setting sail!

I'm sure you might remember the Pirate Pop Up Card from my kiddos' birthday party last summer...well, I've finally got it packed up and available in the Paperthreads store.


Now I realize that you pirate party isn't complete without a cupcake wrapper for the mateys...after all why should the girly princesses get all the fun?

So check out this file, perfect for yer sea-farin folk!


It's already up and waiting for you at the store, so hoist the anchors and avast ye, me hearties!

Sunday, June 20, 2010

Happy Father's Day to all the papas out there!


Hope all of you are having a wonderful Father's Day! I have a freebie to share with you today...it's the first Digi Stamp I've actually gone and "put out there", so PLEASE leave me comments and let me know what you think. The pic you see above is how I chose to embellish my card, but the packaged file contains the vintage PA-PA BINGO card (see the black and white digi stamp below).


The zip file contains the PNG and JPG images, but as an added bonus for those of you with electronic cutters, it contains a cut line as well. Now in this particular case...I just put the image 4 times on one sheet of cardstock (it's a 4 1/4 " by 5 1/2 " digi, or a quarter fold) and then ran through my DreamKutz to separate the images. So easy!

So, if you'd like to download and try the PA-PA BINGO Digi, please be my guest! And if you like it, please let your friends know that they can come here and download it themselves too. Terms of use are included with the zip When you click on the download link below it will ask you for a password to complete the download, simply use:

Friday, June 4, 2010

School is almost over...

My son had his end of the school year ice cream party today. He has 2 more days of Kindergarten left! Oh my, where did the time go?

Just wanted to share some pics of the card I made for his teacher. She's been such a blessing to us this year. Here's the front of the card. The image is a combination of elements from CC Designs. It's actually the Autumn Trevor with the apple and basket from Apple Emma. I just wanted an apple for the teacher and this little guy has his hair sticking up, just like my son's double cowlicks! I just stamped the images, scanned them, then used photoshop to combine the parts I needed.


Now, of course, there has to be a cutter element, LOL! I took the scans, and created the cut lines for the pieces of clothing (sweater and jeans) as well as the apple he's holding. It's actually my first "paper piecing", I think. Printed out the outline (scanned) on the patterned paper, then cut on my KNK. I just love the K&CO denim paper, it looks so real! I popped the apple out in his hand with some small pop-dots. The rest of the image is colored with my Copics...I know, I can't remember the colors right now...I was coloring in the middle of the night, bear with me...I'll try to update later (they're all in the mug in my room, somewhere, LOL!)


Now for the inside; I made a pop-up card. It folds completely flat for shipping, but pops up to show 2 different layers. It was perfect for holding a gift card to the bookstore. I had room on the bottom for my son to write a short note to his teacher, and made my first "kinetic tag" to hide a note from me to her as well.


I put up a side view too, so you can see the layering and the tag pulled out at the right.


Since it was a little thicker (because of the pop-dots), I made a kind-of box-like envelope. Basically I used the Martha Stewart scoring board, and formed two creases (1/8 inch apart) along each side to act as "sides" to the box.


Sealed with a printed apple (from Microsoft clipart, I believe) punched with a scallop punch, signed, and delivered! Enjoy!

Tuesday, June 1, 2010

Completed pirate invitations are in the mail!

Whew! Finally got the invites completed over the holiday weekend and off in the mail today!. I though I'd just share a couple of snapshots of how they turned out...

Here's the front. I made a faux layered circle from the background and made a "mat" with some shadow to help save on materials, time, and most of all...postage! I broke out the distress inks and the MM edge distressing tool...such fun!


Here's the straight ahead view of the inside. It was a bit of a challenge to fit all the info in the small strips to the side...but it worked!


An angled view so you can see the pop-up mechanism...


And of course...the back...where I could add the info I forgot, er, couldn't fit, in the inside!


I even added a pirate/crossed swords as a "seal" to the back of the envelopes when I printed the addresses. Thanks for looking!

Monday, May 24, 2010

FINALLY!

Okay, well really not FINALLY, FINALLY...but close enough! Remember I mentioned sharing a sneak peek of the digi stamp I was working on for Paperthreads? Well, I can finally share my preview with you...


Isn't it cute? The best thing is that it includes cut lines for those of you who have electronic cutters (like the KNK, wishblade, craftrobo, silhouette, or cricut/SCAL/MTC).


It makes it so easy to complte a great card! I used my copics to color, and added some stickles to the centers of one flower for some "bling". I added a strip of green cardstock cut with some fringing scissors for grass to cover up the base. Final size on this card was 8.5 by 3.5, so it fits in a standard size envelope for mailing.

This file also has the 7 pop-up elements too so you can add extra dimension to your creations. (You can click on these pics for closer looks!)


Thanks for looking and/or commenting!


(Don't forget, if you're looking for the Michael's coupon for Cricut carts it can be found in THIS post.)

Thursday, May 20, 2010

I've had a busy day...

I've been working on birthday invitations for my kiddos...their birthdays are only 1 day apart from each other (they'll be turning 4 and 6 this year!) Of course, everything I do seems to involve my KNK in some way, and this was no exception. I really wanted to figure out how to do a 3-D pop-up galleon that displayed when the card was opened 180 degrees...but...I had no idea where to begin, and these need to get in the mail this weekend! So, moving on...

First thing was creating the card insert, then cutting on kraft cardstock. You can see one here laying on my Martha Stewart Scoring Board (more on that later...I realized today how much I adore that thing!)


Next, I wanted to define the ship's wheel. I masked the back of the card with a scrap of paper tucked through the wheel and inked with Tea Dye Distress Ink from Ranger.


You can see now how it really lets the wheel "pop" from the background. I used my Sakura Gelly Roll gold pen to make little faux brass rings on the wheel.


Now on to the magic! Once the insert is folded and creased, I added a separate cut out skull in white cardstock over top of the kraft. You can see here a side view showing some of the depth. Now I just need to figure out how to do the outside of the card, print the details for the party, and get them into the mail!


Sunday, February 7, 2010

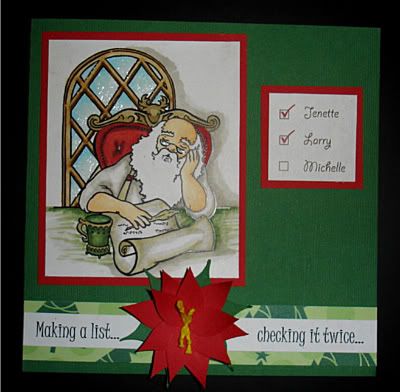
Mojo Monday 124 and a card for Larry

I finished making my card for the RAK for Larry...you can find out more about this HERE at Shirley Clark's blog.

I wanted to get the pics posted tonight, to make it in time for Mojo Monday's challenge 124. It's a CONTEST this week! Woo-hoo!

Here's the sketch...


And here's my take on it...


I apologize for the lighting! It's quite dark right now...I'll try reposting some better pics when I can get some light tomorrow. You can kind of see the gloss over the windows. I put Mod Podge glossy over the panes of glass and Santa's glasses.

In my haste I forgot to share the source of the Santa art! I downloaded it from Elizabeth O. Dulemba's coloring pages and re-sized before printing it out. Colored in afterwards with copics, of course.

I made the poinsettia on my KNK and then tied "stamens" out of gold colored DMC floss.

Monday, February 1, 2010

Combining Challenges!

I was so proud of myself last night. I was able to combine 3 challenges into one card! (Of course in the time it took to come up with it I probably could have created three cards...but that's another story.)
The sketch idea itself is another from Card Positioning Systems wk 152.


The Cuttlebug Challenge was to create a vintage Valentine...

The card also fits the rules for the Red Heart Card challenge at Caardvarks. The challenge was to make a card with something red, and to include hearts. I made a Valentine's Day "tangle" that includes hearts, locks, and keys.


The tangle of keys and locks was cut on my KNK with some "lipstick red" vinyl I had on hand and applied to a vintage sheet of music paper I printed out. Please forgive me! I got it as a free download from an online site, the name just escapes me right now and I can't seem to find it in the browser history. The card itself is kraft edges with Frayed burlap Distress ink. I thought the bracket edges reminded me of the triangles in the CPS sketch above.

Thanks for looking!


Wednesday, January 27, 2010

CPS challenge...

I finished another card today. This one was inspired by the sketch at Card Positioning Systems. You should check out their inspiration pieces, they're great!

The sketch for this week was CPS 151


Here's my take on the sketch...


Supplies:
Cardstock base: Georgia Pacific
Patterned paper: heidi grace designs
Scalloped edge my own design for the KNK
Figures: Cart-O-Graphics template for electronic cutters
Font: 2 Peas Piano Recital

Thanks for looking!

Tuesday, January 26, 2010

Snow, Snow, go away!


I finished the card I was telling you about using the Swiss Pixies Nora stamp. The mat is sanded Garden Gate Whitewashed Coredinations cardstock embossed with the Cuttlebug Snow Sledding words embossing folder.

Friday, January 22, 2010

Swiss Pixies - Nora

I've had some more time to play! I'll share the pics of the card once I finish it, but I got to use a few techniques on the last image I colored.


Once again, used my copics for the coloring...I need to get a few markers in the sketch form so that I can have better colors for hair. I feel kind of restricted to browns and blacks with the ciaos.

Here's the colors I used...


I used Artic Ice Stickles for her wings, hope you can see the sparkle in the photo! It's so pretty up close.


I colored over the boots with a Versamark pen once I was done shading the copics. I applied detail clear embossing powder and melted, then added a second coating. I think it gives the boots the look of wet galoshes.


I'll pop up pics when I'm done! Thanks for looking.

Wednesday, January 20, 2010

Another card creation - inspired by Mojo Monday Week 122

Today's card was inspired by Mojo Monday's Week 122 sketch. Here's the sketch it's based on...


And here's my card...I flipped the sketch on the side since all of the stamps I have are vertically oriented.


I colored in the Apple Emma (by CC Designs) with my Copic ciaos. (BTW, I think I "need" to pick up a few sketch ones too...since I don't have the colors I want for a true redhead!)


(Stamped on GP cardstock)
Hair: E35, E33, E31
Skin: E51, E50, E00
Cheeks: R11
Apples: YR31, R17, R37
Dress: YG03, YG06
Basket: E35, E33


I was pretty happy with the highlight along the crown of her hair and her shoes. I was a little at a loss as to what to do with the apron. Suggestions?

The "Kindergarten" handwriting paper is one I printed to match the copic choices in the stamp. I created the jpg, printed, and then cut the notebook edge with my KNK. The scalloped oval was also created with my KNK.

The strip of apples is glazed cardstock for me & my Big Ideas (Ellen Krans - School Days)

Oops! Just realized I forgot to add the shadow along the edge, well, I can add it later!